All posts by Soccerdrillsapp

Defending

Teaching Individual Defensive Soccer Skills

One of the great things about running a site like soccerdrillsapp.com is that we interact with our followers by receiving feedback or questions from them. This interaction allows us to fill the holes that are either unintentionally left in our practice sets, or we are just starting to scratch the surface of.

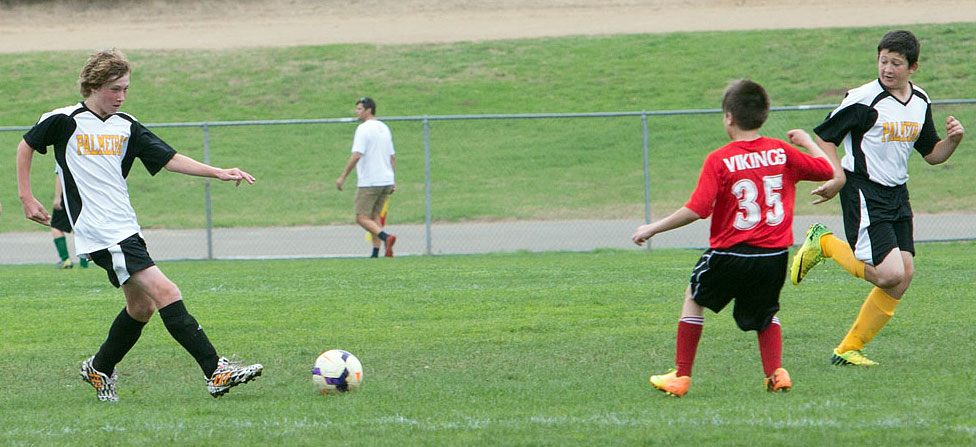
Several of our followers have recently sent us a request for ideas on defensive drills. Incidentally, at a practice two nights ago, I overheard some parents talk (parents never complain) about how their kids’ team never works on defense.

Continue reading

Defending

Teaching Team Defensive Soccer Skills

If you haven’t yet, you should read the Individual Defending post first as Team Defending builds on those concepts. If you have, please read on…

Team Defending

All team defending relies on individual defenders being able to handle their assignments.

However, good positioning and communication (often hard to achieve with young players) by teammates can have an enormous impact in helping an individual defender successfully complete the challenge.

Here we offer a couple of drills that can help teams achieve some “team chemistry” when defending, and translate that into a successful transition on offense.

Continue reading

Dribbling And Control

Week 4 Soccer Practice Drills for U4, U5 & U6 Teams

Setup

Field Setup

  • Each player has a ball
  • Set down cones to make a 40×30 steps field for 10 players – larger if more players
    • Anything can be a cone (an article of clothing, a water bottle, any marker)
    • Set cones every ten steps
  • Do not set up any goals
    • If there are goals, players will shoot on them and not listen to you
  • Demonstrate each drill / game before starting it

Continue reading

Dribbling And Control

Week 4 Soccer Practice Drills for U7, U8 & U9 Teams

Setup


Field Setup

  • Each player has a ball
  • Set down cones to make a 50×40 steps field for 12 players – larger if more players
    • Anything can be a cone (an article of clothing, a water bottle, any marker)
    • Set cones every ten steps
  • Do not set up any goals
    • If there are goals, players will shoot on them and not listen to you
  • Demonstrate each drill / game before starting it

Continue reading

Dribbling And Control

Week 4 Soccer Practice Drills for U10, U11 & U12 Teams

Setup

Individual Boxes Setup

  • Each player has a ball
  • Set down cones to make 5×5 steps boxes for each players
    • Setting down 4 lines (5 steps apart from each other) of 5 cones (5 steps apart from each other) = 12 boxes
  • Demonstrate each drill / game before starting it

Drill 1 – Dribbling – 10 minutes

Drill 1 consists of 5 2-minute mini drills

  • Split players into 4 lines
  • For each mini drill, the next player in line goes when the player in front reaches the 3rd cone
  • When players finish go through the cones, they run back (on the outside of the cones) to rejoin the back of their own line

Continue reading

Dribbling And Control

Week 3 Soccer Practice Drills for U10, U11 & U12 Teams

Setup

Field Setup

  • Each player has a ball
  • Set down cones to make a 60×50 steps field for 18 players – larger if more players
    • Anything can be a cone (an article of clothing, a water bottle, any marker)
    • Set cones every ten steps
  • Do not set up any goals
    • If there are goals, players will shoot on them and not listen to you
  • Demonstrate each drill / game before starting it


Drill 1 – Juggling – 5 minutes

  • Juggle the ball for 5 minutes
    • The objective is to keep the ball from falling to the ground using your feet, thighs, shoulders, or head. Give the players 5 minutes to see how many touches they can get without the ball falling to the ground.
      • Players should remember their high score
      • Keep the high score to themselves. In future practices they will try to improve on this high score

Drill 2 – Dribbling – 5 minutes

  • Dribble the ball anywhere within the field of play
  • Use the entire space
    • Do not let players bunch up
  • Keep the ball close to you while running
    • Can the players run and keep the ball under control
    • Players who are walking should be urged to run
    • Players who are running too fast should be urged to slow down in order to stay under control
  • Have the players perform some moves on your command
    • Stepover, Inside-out, Outside-in, Stop-and-go, Cruyff, Inside-inside (go here to find videos showing these moves)
  • Make sure the players are using both feet equally
  • Make sure the players keep their head up while dribbling
    • Safety – to see where they are going
    • Technique – to see where they could pass the ball to

Drill 3 – 10 minutes (with setup and instruction)

Setup Square Balls On Inside

Drill 3 involves 3 mini drills. The first 2 mini drills use the setup described below. The only difference in the setup of the 3rd mini drill is that it switches where the soccer balls are at the beginning of it.

  • Split the players into two equal teams
    • Hand out pennies (training vests) to one team
  • The players wearing the pennies stand on the outside of the cones without any soccer balls 
    • For the 3rd mini drill, the outside players have the soccer balls
  • The players wearing regular shirts are inside of the cones with soccer balls at their feet
    • For the 3rd mini drill, the inside players are without the soccer balls
  • HINT: For all of these drills, it is extremely important that players keep their head up in order:
    • Not to collide with other players (safety), and
    • To communicate with each other (for drill to work)
      • The communication has to be two-ways.
        • The player dribbling/passing the ball calls out the name of the teammate that ball is going to be dribbled/passed to
        • The player receiving the ball confirms with the dribbler/passer that they are about to exchange a dribble/pass.
    • Encourage players to go to a different side of the field to after they take over a dribble or receive a pass, rather than just going to their neighbor

Drill 3 – 1st mini drill – takeover – 2 minutes

Dribbling Takeover

  • Inside players dribble the ball to an outside player
  • Players perform a takeover
    • The inside player (the dribbler) calls out the name of the player on the outside where the ball is being dribbled
    • The outside player says “my ball”
    • The inside player stops dribbling the ball and the outside player takes it over
  • Player that was outside is now inside, dribbling the ball into the middle, looking for another player on the outside to perform a takeover with
  • Player that was inside is now outside waiting for another dribbler that will come to perform a takeover
  • Go for 2 minutes


Drill 3 – 2nd mini drill – dribble+pass+move – 2 minutes

Square Passing Exchange 1

Square Passing Exchange 2


  • The same as the 1st mini drill, except:
    • The inside players now pass the ball to the outside players
      • The inside player calls out the name of the outside player, the intended receiver
      • The outside player acknowledges that the pass from that passer will be received
      • The pass is made
        • The inside player runs to the spot where the pass went and waits for another pass to come
    • Outside players trap the ball, dribble into the middle, and pass it to another outside player
      • After making the pass, the player runs to that outside spot to await the next pass

Drill 3 – 3rd mini drill – trap+turn+pass – 1+1+1+1 minutes

Setup Square Balls On Outside

  • Outside players start with the ball
Square Trap Turn Pass

1. Outside player passes to the inside player; 2. Inside player traps the ball

Square Trap Turn Pass 2

3. Inside player turns with the ball; 4. Inside player passes the ball to an outside player who does not have a ball at the feet; 5. Inside player runs towards an outside player with the ball to receive a new ball

  • Ball is passed to an inside player
    • Inside player traps the ball, turns with it, and finds another outside player (one without a ball) to pass the ball to
      • Remember the HINT about keeping the head up for safety/communication
  • The players do not switch inside/outside in this drill
  • After passing the ball, inside player looks for a pass from another outside player and performs the same: trap, turn, and pass to another player (one without a ball)
  • Go for 1 minute then switch inside/outside players
  • Go for another minute then switch inside/outside players again
  • Go for 1+1 more minutes to give each group a 2nd try on the inside

Game 1 – Scrimmage – Switch the Field/Switch the Point of Attack – 20 minutes

Scrimmage Switch the Field Setup

Setup

  • The players are already split into 2 teams
  • Place goals on the endlines of your field
  • Lay down a line of cones to designate a defender-free area, 7-8 steps wide
  • Put 2 players, 1 from each team, into the defender-free zone
  • These “wings” play for both teams, running up and down the line, wherever the ball is located
    • Every 2 or so minutes switch who the wings are to make sure everyone gets a turn

Game

  • The teams cannot score a goal until both of the wings have touched the ball during a possession
    • Every time the team wins the ball it should look to…
      • Pass to one wing
        • Encourages going out wide early
      • Then pass to the other wing
        • Switching the field/point of attack
    • … before it shoots

Game 2 – Regular Scrimmage – 5 minutes

  • Take away the defender-free zones and the wings and see if the players continue to pass wide early and/or try to switch the field/point of attack

Drill – Switch the Field/Point of Attack and Shoot – 15 minutes (with setup and instruction)

  • Demonstrate proper shooting technique
    • Trap the ball 2 to 3 steps in front of you
    • Run up to the ball, lock your ankle, lean forward so your chest is over the ball, and shoot using either:
      • The inside of your foot to place the ball into the goal (more accuracy less power)
      • The laces to shoot the ball harder (more power less accuracy)
  • Put a goalkeeper in the big goal
    • If you don’t have a goal to work with, place two cones/bags/shirts about 8 big steps apart
    • Give the goalkeeper the same instructions as if you would for a game
  • Split players into 3 lines
    • The “passing” line has all of the balls and is located:
      • Wide right, 5 to 7 steps from the right sideline
      • 40 steps from the goal line/endline
    • The “turning” line is located:
      • In the middle of the field
      • 35 steps from the goal
    • The “shooting” line is located:
      • Wide left, 5 to 7 steps from the left sideline
      • 30 steps from the goal line/endline
  • Put a cone to act as a defender on the top of the 18-yard box, to the left of the center
Shooting Switch the Field 1

1. Player in the passing line passes the ball to the turning line and then joins the back of the turning line; 2. Player in the turning line turns with the ball

  • Player in the passing line passes the ball to the turning line
    • After the pass is made, the player joins the back of the turning line
  • Player in the turning line turns with the ball
Shooting Switch the Field 2

3. Player in the turning line passes the ball to the shooting line and then joins the back of the shooting line; 4. Player in the shooting line traps the ball; 5. dribbles towards the “defender” (a cone), and; 6. beats a defender with a move

  • Player in the turning line passes the ball to the shooting line
    • After that pass is made, the player joins the back of the shooting line
  • Player in the shooting line traps the ball, dribbles towards the “defender” (a cone), and beats a defender with a move
Shooting Switch the Field 3

7. The player shoots the ball and then retrieves the ball and joins the back of the passing line

  • The player shoots the ball
    • The shooter retrieves the ball and joins the back of the passing line


End Practice

  • Team cheer
    • 1,2,3 Go “team name”!
Dribbling And Control

Week 3 Soccer Practice Drills for U7, U8 & U9 Teams

Setup


Field Setup

  • Each player has a ball
  • Set down cones to make a 50×40 steps field for 12 players – larger if more players
    • Anything can be a cone (an article of clothing, a water bottle, any marker)
    • Set cones every ten steps
  • Do not set up any goals
    • If there are goals, players will shoot on them and not listen to you
  • Demonstrate each drill / game before starting it

Drill 1 – Intro to Juggling – 5 minutes

Players stand in a big circle, holding the soccer balls in their hands

  • From chest-high
    • Drop the ball and hit it back up into your hands using your thigh
      • Keep an eye on the ball and watch as your thigh hits it
        • HINT: Your thigh hits the ball, not the other way around. You control where the ball goes
      • Repeat several times, then,
    • Drop the ball and hit it with one thigh, then the other thigh, and then catch it with your hands
      • Keep an eye on the ball and watch your one thigh, and then the other thigh, hits the ball
      • Repeat several times, then,
    • Drop the ball and kick it with your foot back up into your hands
      • Again, keep an eye on the ball and watch as your foot kicks the ball back up
        • Do not drop the ball and try to kick at the same time (many players do this), but wait for it to drop close to your foot before kicking it back up
      • Repeat several times, then
    • Drop the ball and kick it with one foot, then the other foot, and then catch it with your hands
      • Watch the ball get kicked with one foot and then the other foot

Drill 2 – Dribbling – 5 minutes

  • Dribble the ball anywhere within the field of play
  • Use the entire space
    • Do not let players bunch up
  • Keep the ball close to you while running
    • Can the players run and keep the ball under control
    • Players who are walking should be urged to run
    • Players who are running too fast should be urged to slow down in order to stay under control
  • Every 30 seconds or so, ask players to perform one of 3 moves learned during Week 1 or Week 2

Drill 3 – Inside-Inside move – 10 minutes

  • Demonstrate the move
    • Dribble at a moderate pace
    • Then, tap the ball slightly with the inside of one foot (to freeze the defender) and immediately take a big touch with the inside of the other foot to beat the defender
    • Accelerate for several steps
    • Go back to dribbling regularly at a moderate pace
  • For the first 5 minutes, players dribble, but when you say “Inside-Inside” they perform the move
  • For the next 5 minutes, players dribble, but when you call out a move (stop-and-go, inside-out, stepover, inside-inside), players perform the move you called out roughly every 30 seconds


Drill 4 – Pass and Move – 5 minutes

Passing inside

  • Reiterate proper passing technique
      • Find your target (where you are passing)
      • Take two steps away from the ball
      • Run up to the ball so that your planted (non-kicking) foot is to the side of the ball, and slightly behind it, and pointing in the direction you want the ball to go
      • Lock the ankle of your kicking foot, so it is sturdy and the toes are pointing slightly up
      • Use the inside of your foot to kick the ball in the center of it
      • Follow through with your kicking foot so that it comes off the ground, about shin-high


    Dribble Both Moving Pass

    1. One partner dribbles the ball; 2. The other partner moves without the ball; 3. Upon the “Pass!” command, the first partner finds where the other one is and passes the ball; 4. The other partner now dribbles the ball; 5. The partner who first had the ball is now running without it until the “Pass!” command comes again

  • Pair up the players
  • Both partners are moving anywhere in the field
    • one dribbles the ball and the other runs around without the ball in the field of play
  • When you say “Pass” the one with the ball finds where the other partner is and passes it
  • Both partners continue to move

Drill 5 – Pass and Move, 3 touch – 5 minutes

Same as Drill 4 above, except: 

  • The players now pass  the ball to one another on their 3rd touch
    • Take one touch to trap the ball
    • Take a second touch to get the ball going in the right direction
    • The third touch is a pass

Drill 6 – Pass and Move, Give-and-Go – 5 minutes

Same as Drill 4, except: 

  • For 2.5 minutes, one player dribbles the ball, the partner runs around without the ball
  • When you say “Pass”, about every 30 seconds
    • Player dribbling the ball passes it to the partner and makes a run into space
    • The partner takes one or two touches and plays the ball back to the dribbler
    • The dribbler continues to dribble while the other partner moves around without the ball
  • For the remaining 2.5 minutes, switch which partner is doing the dribbling and which is receiving and passing the ball

Game 1 – Scrimmage – 15 minutes

Week 1 - Level 2 - Scrimmage

  • Set up a small goal on each of the end lines of your field
    • Either use Pugg goals, or place two cones/bags/shirts about 3 steps apart from each other
  • Split into two teams
  • For the first 5 minutes, demand that any of the four moves (stop-and-go, inside-out, stepover, inside-inside) learned to date must be used before a team can score a goal
  • For the next 5 minutes, demand that a team must make a Give-and-Go pass before it can score
  • For the final 5 minutes, just play without restrictions and see if they continue to use moves and passes


Drill – Give-and-Go and Shoot – 10 minutes

Shooting Pass and Go Setup


  • Reiterate proper shooting technique
    • Trap the ball in front of you
    • Take a touch to get the ball 2 to 3 steps ahead of you
    • Run up to the ball, lock your ankle, lean forward so your chest is over the ball, and shoot using either:
      • The inside of your foot to place the ball into the goal (more accuracy less power)
      • The laces to shoot the ball harder (more power less accuracy)
  • Put a goalkeeper in the big goal
    • If you don’t have a goal to work with, place two cones/bags/shirts about 8 big steps apart
      • Give the goalkeeper the same instructions as you would on gameday
  • Half of the players line up about 20 yards away from the goal (put a cone down that players will stand behind)
    • The other half of the players line up another 10 yards behind and to the side of the other line
      • This is the shooting line that will take the balls with them
Shooting Pass and Go Breakdown

1. Player from shooting line passes the ball to player in passing line; 2. The shooter then makes a run towards the goal; 3. The passer traps the ball; 4. The passer passes the ball in front of the shooter who is running towards the goal; 5. The shooter controls the ball in front to set up a shot; 6. The shooter shoots the ball

  • Player from the shooting line passes to the player ahead in the passing line
    • Player from the shooting line starts a run towards the goal after the pass
  • The player ahead in the passing line traps the ball, and passes it back to the player who is running towards the goal
    • Pass the ball in front of the runner, not at the runner
  • The player from the shooting line takes 1 or 2 touches to control the ball in front to set up a shot, and shoots the ball with the 2nd or 3rd touch
  • The shooter, not the goalie, retrieves the ball and goes to the back of the passing line (sends the ball to the back of the shooting line)
    • The passer goes to the back of the shooting line

End Practice

  • Team cheer
    • 1,2,3 Go “team name”!
Dribbling And Control

Week 3 Soccer Practice Drills for U4, U5 & U6 Teams

Setup

Field Setup

  • Each player has a ball
  • Set down cones to make a 40×30 steps field for 10 players – larger if more players
    • Anything can be a cone (an article of clothing, a water bottle, any marker)
    • Set cones every ten steps
  • Do not set up any goals
    • If there are goals, players will shoot on them and not listen to you
  • Demonstrate each drill / game before starting it


Drill 1 – 5 minutes

https://youtu.be/VQPjXl48cl0
  • Dribble the ball anywhere within the field of play, using only your feet
    • Remind players that they can use any part of their foot
  • After 1 minute, ask the players to use just the inside of their feet to dribble, for about 20 seconds
  • After another minute, ask the players to use just the bottom of their feet to dribble (roll the ball over), for about 20 seconds
  • Repeat the just the inside and just the bottom of the feet one more time, about a minute apart for 20 seconds each
  • Use the entire space
    • Do not let players bunch up
  • Keep the ball close while dribbling
    • Can the players run and keep the ball under control
    • Players who are walking should be urged to run
    • Players who are running too fast should be urged to slow down in order to stay under control


Game 1 – “Lights” – 5 minutes

Objective: Follow directions to get to the opposite side of the field
https://youtu.be/L65QV-kuWZM
  • Players line up on one of the long (40 steps) sidelines
  • You are on the opposite sideline
  • Game: Call out a color light
    •  Green light: they run and dribble towards you
    •   Yellow light: they walk and dribble towards you
    •   Red light: they stop the ball with the bottom of their foot – the sooner the better (Remember the HINT from the previous drill: keep the ball close to you)
    •   Disco light: they stop and give you their best dance moves
  • If players advance too fast because they are not under control, send them back to their last spot
    • There are no winners for reaching the opposite sideline first, everyone goes at their own pace

Game 2 – “Lights + Part of foot” – 5 minutes

Same as “Lights” except:

  • Every time you call “Green Light” orYellow Light” also call out either “Inside” or “Bottom” of the foot for players to dribble using only that part of the foot


Setup

5 Cones Dribbling Setup

  • Set 2 lines of 5 cones
    • About 3 steps of space between the cones
  • Half of the players line up behind the first cone on one line, and half line up behind the first cone in the other line
  • Each player has a ball

Drill 2 – 5 minutes

5 Cones Dribbling to the Right

  • Players dribble, one at a time, staying to the right of the cones going up the line, and again to the right coming back down the line
  • When a player gets to the last cone of the line, the next player in line goes
  • When a player gets back to the beginning cone, the player goes to the back of the line

Game 3  Relay – 5 Minutes

Same as Drill 2 above, except: 

  • There is only one ball per team
  • The player has to complete the whole loop and dribble to their teammate who goes next
  • In 2 minutes, how many “segments” can a team complete
    • A segment is a player dribbling all the way up, and then all the way down, the cones
  • Take a minute to reiterate dribbling technique
    • Use any part of the foot
    • Keep the ball close to you
  • In the remaining 2 minutes, how many “segments” can a team complete


Drill 3 – 5 Minutes

5 Cones Dribbling Slalom

Same as Drill 2, except: 

  • The players slalom through the cones on the way up
    • The next player goes once the player in front reaches the last cone
  • The players run to the back of their line on the outside of the cones

Game 4  Slalom Relay – 5 Minutes

Same as Game 3, except: 

  • In 2 minutes, how many segments can a team complete while slaloming through the cones up, and dribbling the ball on the outside of the cones to their teammate who goes next
  • Take a minute to remind the players to use the inside part of their outside foot (so inside of the left foot when the ball should go to the right and vice versa) to manipulate the ball back through the cones
  • In the remaining 2 minutes, how many segments can a team complete…

Drill 4 – 5 Minutes

Same as Drill 3, except: 

  • The players use the bottom of their foot to roll the ball over through the cones
    • Use the bottom of the right foot to roll the ball over to the left side of the cones
    • Use the bottom of the left foot to roll the ball over to the right side of the cones

Game 5  Roll Over Relay – 5 Minutes

Same as Game 4, except: 

  • Players roll the ball over with the bottom of their foot rather than using the inside of their foot to slalom through the cones


Setup

5 Cones Passing Setup

  • Extend the distance between the cones from 3 steps to 6 steps
  • Pair up the players
  • Each pair has one ball between them
  • Each pair has 2 cones it will use as a goal
    • One player goes on one side of that goal
    • The other player goes on the other side of the goal
  • The players should be roughly 7 steps apart from each other

TEACH PASSING TECHNIQUE  – 5 Minutes with Setup

Passing inside

  • Take two steps to approach the ball
    • Not straight on, but with a little bit of a curve in the approach
  • Plant the non-kicking foot next to, and a little bit behind, the ball in the direction in which you want the ball to go in
  • Lock the ankle of your kicking foot, so it is sturdy with the toes pointing slightly up
  • Use the inside of your foot to kick the ball in the center
  • Follow through with your kicking foot so it comes off of the ground, about shin high

Drill 5 – 5 Minutes

5 Cones Passing 5 Yards

  • Players, who are about 7 steps apart, pass the ball to each other through the goal, about 6 steps wide
    • Force players to stop the ball before they pass it back
      • At least two touches, no one-touch passing that will result in no control

Game 6 – 5 Minutes

Same as Drill 5 above, except: 

  • In 2 minutes, how many goals can a pair score
  • Take a minute to reiterate passing technique and remind players they have to take at least 2 touches
  • In the remaining 2 minutes, how many goals can a pair score


End Practice

  • 1,2,3 Go “team name”!
Soccer Passing

Improving Your Team’s Soccer Game Speed

One of our readers wanted to know how to improve his team’s game speed…

The most important thing for your players to learn when it comes to increasing game speed is to have an idea of what their next move will be before they get the ball. Using formations with a lot of triangles can help because the player with the ball should always have two options to pass. If the first option is blocked she can go to the second one. However, it takes a bit of maturity from the players to get to this stage.

Continue reading

Kicking Technique

Teaching Young Kids Proper Soccer Kicking Technique

One of our readers asked for drills and tips on teaching his kids to kick properly (and not with the toes), so we thought we’d post here for everyone’s benefit. 

One of our favorite drills to practice proper shooting is the trap and shoot drill. We recommend drills where the ball is moving, because that is what the players will encounter most during the game. The important part is to teach the technique and then get the kids a lot of repetition. The basics of the technique are the following:

  • approach the ball from a slight angle, not straight on
  • plant the non-kicking foot slightly to the side of the ball
  • lock your ankle before striking the ball
  • lean forward over the ball before striking it and follow through to regain your balance after the ball was kicked.

Continue reading