Setup
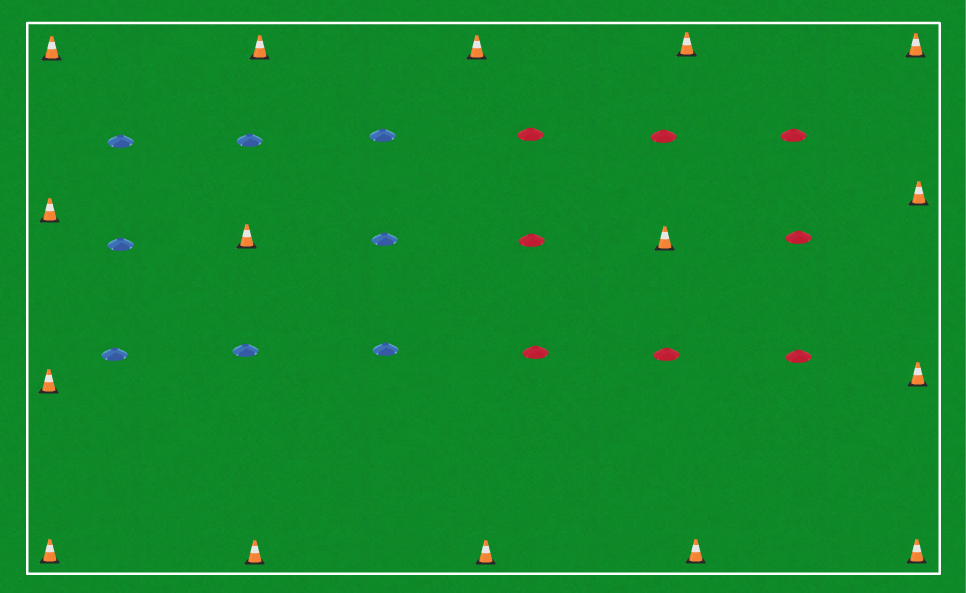
- Each player has a ball
- Set down cones to make a 50×40 steps field for 12 players – larger if more players
- Anything can be a cone (an article of clothing, a water bottle, any marker)
- Set cones every ten steps
- Within that field, set down cones to make 2 boxes (about 20×20 steps)
- Set a cone in the center of each box
- Do not set up any goals
- If there are goals, players will shoot on them and not listen to you
- Demonstrate each drill / game before starting it
Drill 1 – Beginner Juggling – 5 minutes
Players stand in a big circle, holding the soccer balls in their hands
- From chest-high
- Drop the ball and hit it back up into your hands using your thigh
- Keep an eye on the ball and watch as your thigh hits it
- HINT: Your thigh hits the ball, not the other way around. You control where the ball goes
- Repeat several times, then,
- Keep an eye on the ball and watch as your thigh hits it
- Drop the ball and hit it with one thigh, then the other thigh, and then catch it with your hands
- Keep an eye on the ball and watch your one thigh, and then the other thigh, hits the ball
- Repeat several times, then,
- Drop the ball and see how many times a player can hit the ball with the thighs without the ball hitting the ground, then,
- Drop the ball and kick it with your foot back up into your hands
- Again, keep an eye on the ball and watch as your foot kicks the ball back up
- Do not drop the ball and try to kick at the same time (many players do this), but wait for it to drop close to your foot before kicking it back up
- Repeat several times, then
- Again, keep an eye on the ball and watch as your foot kicks the ball back up
- Drop the ball and kick it with one foot, then the other foot, and then catch it with your hands
- Watch the ball get kicked with one foot and then the other foot, then,
- Drop the ball and see how many times a player can hit the ball with the feet without the ball hitting the ground, then,
- Drop the ball and see how many times a player can hit the ball with either the thighs or the feet without the ball hitting the ground
- Drop the ball and hit it back up into your hands using your thigh
- Give the players several tries and ask them to remember their high score
- This is the score they will try to beat when they juggle from now on
Drill 2 – Dribbling at a Cone – 20 minutes (comprises several mini drills and several demonstrations)
Setup
Using 1 of the 2 boxes set up on the field:
- Split the team up 4 ways, sending each set of players (2 to 4 players, depending on the size of the team) to one of the corners of the box
- Each player has a ball
Mini Drill 1 – Turn Back Using Inside of the Foot – 2 minutes
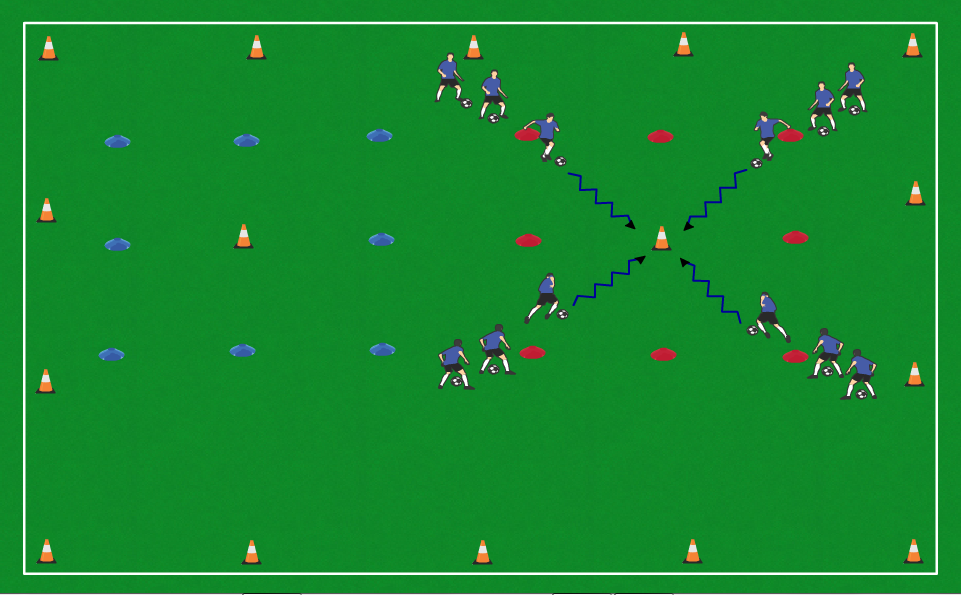
- 1st player in line (each line goes at the same time) dribbles towards the middle cone, using only the right foot
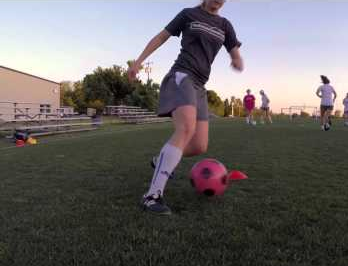
- Just before reaching the middle cone, the players turn back towards the cone they came from using the inside of the right foot

- Players dribble to the back of their own line using only the right foot, then the next player in line goes
- Keep going for 1 minute, then switch to left foot only for 1 minute
Mini Drill 2 – Turn Back Using Outside of the Foot – 2 minutes
Same as Mini Drill 1, except:
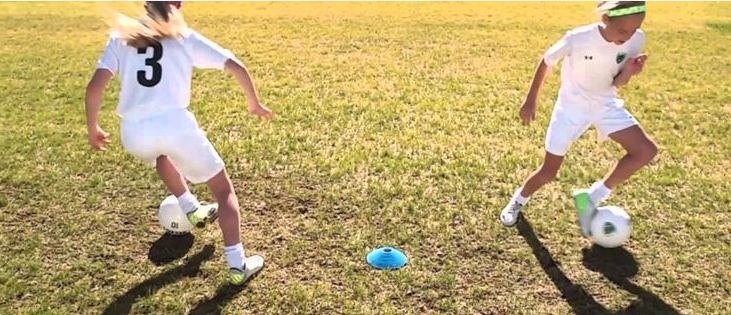
- Players use the outside of the foot to turn away from the cone
- 1 minute right foot only, then 1 minute left only
Mini Drill 3 – Turn Back Using Bottom of the Foot – 2 minutes
Same as Mini Drills 1 and 2, except:
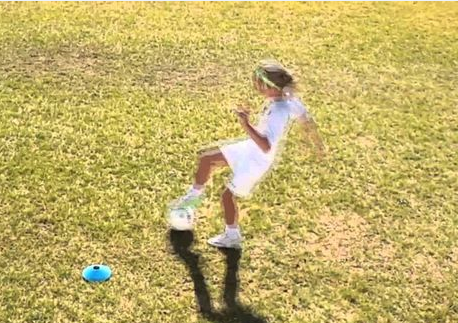
- Players use the bottom of the foot to turn away from the cone
- 1 minute right foot only, then 1 minute left foot only
Mini Drill 4 – Beat the Cone with Inside-Out move – 2 minutes
- Players will go 2 at a time
- Opposing lines go at the same time
- The other two lines go after the first lines pass the center cone
- Instead of turning at the cone, the players will beat the cone using the inside-out move
- Then dribble to the end of the opposite line
- Use right foot only for 1 minute, then use left foot only for another minute
- When using the right foot, the players will beat the cone to the right
- When using the left foot, the players will beat the cone to the left
Mini Drill 5 – Beat the Cone with Stepover move – 2 minutes
Same as Mini Drill 4, except:
- Players use the stepover move to beat the cone
- For 1 minute, use right foot only until you reach the cone, then perform the move beating the cone to the left, and use the left foot to dribble away from the cone
- Switch for 1 minute, using the left foot until you reach the cone, perform the move beating the cone to the right, and use the right foot to dribble away from the cone
Mini Drill 6 – Beat the Cone with Stop-and-Go move – 2 minutes
Same as Mini Drills 4 and 5, except:
- Players use the stop-and-go move to beat the cone
- For 1 minute use right foot only, beat the cone to the right, and continue to use the right foot to get to the end of the other line
- Switch to left foot for 1 minute after that
Mini Drill 6 – Beat the Cone with Inside-Inside move – 2 minutes
Same as Mini Drills 4, 5, and 6, except:
- Players use the inside-inside move to beat the cone
- For 1 minute use the right foot only, perform the move (right-left-right) and beat the cone to the right, and continue using the right foot to get to the end of the other line
- Switch to left foot for 1 minute after that
Mini Drill 7 – Beat the Cone with any move – Remainder of 20 minutes
Same as Mini Drills 4, 5, 6, and 7, except:
- Players are not limited in which foot they use to dribble or make a move
- Players are encouraged to make any move they want to
- It can be a move learned in practice, or a move they saw in a game, or a move they just made up
Drill 3 – Passing Around a Box – 20 minutes (comprises several mini drills and several demonstrations)
Setup
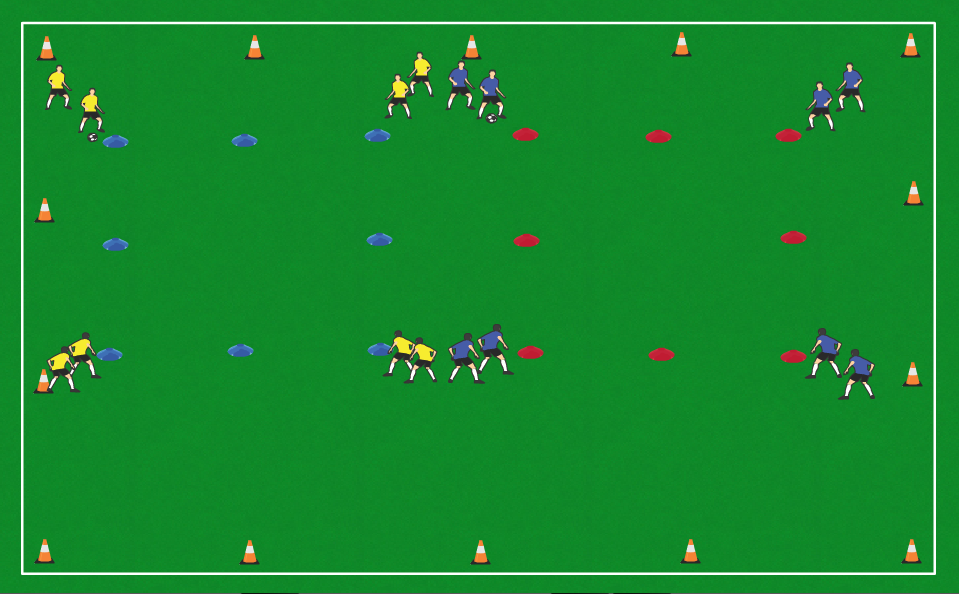
- Split the players into two teams (at least 5, but hopefully no more than 8 players per team)
- If you have more than 16 players, create a 3rd box
- Send one team to one box, and the other team to the other box
- Send at least 1 player to 3 of the 4 corners of the box, and at least 2 players to 1 of the 4 corners
- Only one ball is needed
- The ball should be at a corner that has at least 2 players at it
- Remove the cones from the center of the boxes
Mini Drill 1 – Pass and Move Clockwise – 4 minutes
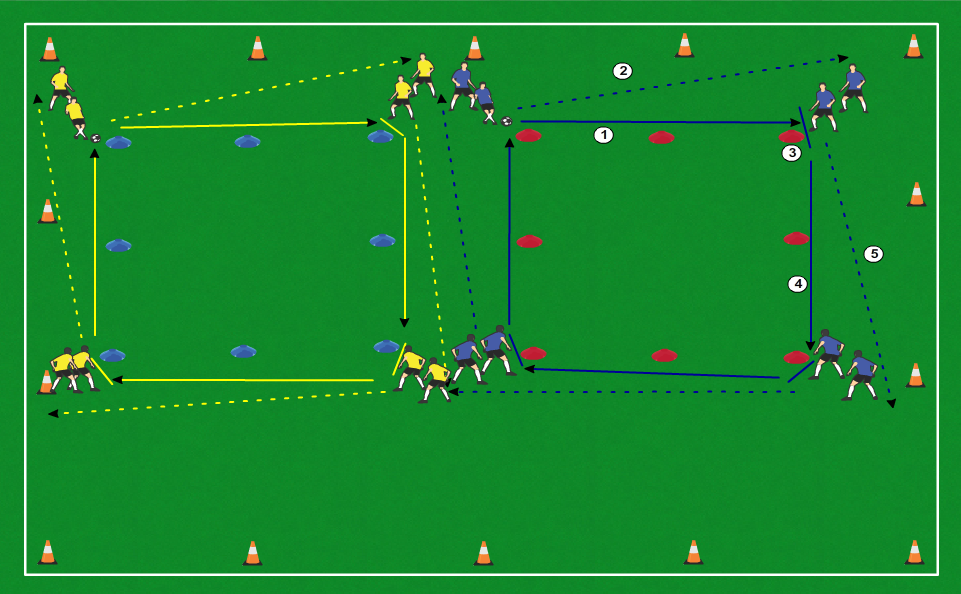
1. Player passes the ball to a teammate on the next corner of the box; 2. Player makes a run to the back of the line at the corner of the box where the ball was just passed to; 3. Receiving player traps the ball into space that player will be passing the ball to; After passing the ball off to the next corner of the box, the player makes a run to the back of the line at that corner of the box; etc.
- Player passes the ball to the 1st player in line to the left
- Player follows the ball by running to the back of the line the ball was just passed to
- That player traps the ball and passes it to the 1st player in line to the left
- Player follows the ball by running to the back of the line the ball was just passed to
- Keep going for 4 minutes
- See if the drill can go without breaking down (the ball keeps moving, the players move after the pass)
- HINT: Encourage players to trap the ball into the space they will be passing it into
- Trap to the left rather than in the front to facilitate faster ball movement
Mini Drill 2 – Pass and Move Counter Clockwise – 4 minutes
Same as Mini Drill 1, except:
- Pass and move counter clockwise
Mini Drill 3 – Pass and Move Double-Pass – Remainder of 20 minutes

1. Player passes the ball to a player on the next corner of the box; 2. Passing player runs towards the corner of the box the ball was just passed to; 3. Receiving player traps the ball; 4. Receiving player passes the ball back to the passing player; 5. Receiving player starts to run towards the next corner of the box; 6. Passing player traps the ball; 7. Passing player passes the ball into the space the receiving player is running into; 8. Receiving player traps the ball into space; 9. Receiving player passes the ball to the next corner of the box; etc.
Same as Mini Drills 1 and 2, except:
- The player who passed the ball runs towards the player trapping the ball
- The player traps the ball and passes it back to the player who passed it in the first place
- This should be a short pass as the player should have been moving towards the receiving player
- This player traps the ball and passes it back, but slightly in front of the receiving player who passes it to the next player
- The direction (clockwise or clockwise) does not matter
- If the players are performing the double-pass correctly, then feel free to switch the direction as you see fit to challenge the players
- HINT: The first two passes (the initial pass and the pass back) are to the players’ feet, the 3rd pass is into the space the receiving player will run into to keep the drill going
- HINT: Make sure the players take the extra touch to trap the ball before passing it on
- As they get more experience they will eliminate this extra touch and perform 1-touch passing, but for the sake of keeping the drill going, the extra touch is desired
Drill 4 – Shooting Drill – Double Pass – 15 minutes
Setup
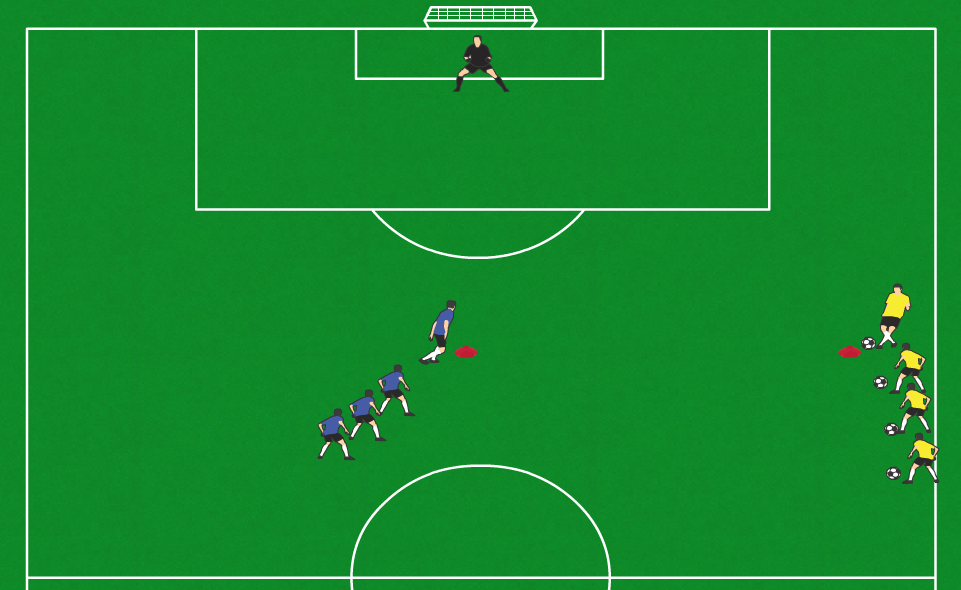
- Demonstrate proper shooting technique
- Run up to the ball, lock your ankle, lean forward so your chest is over the ball, and shoot using either:
- The inside of your foot to place the ball into the goal (more accuracy less power)
- The laces to shoot the ball harder (more power less accuracy)
- Run up to the ball, lock your ankle, lean forward so your chest is over the ball, and shoot using either:
- Put a goalkeeper in the big goal
- If you don’t have a goal to work with, place two cones/bags/shirts about 8 big steps apart
- Give the goalkeeper the same instructions as you would on gameday
- If you don’t have a goal to work with, place two cones/bags/shirts about 8 big steps apart
- Split players into 2 lines
- The shooting line is behind a cone located about 30 yards away from the goal, in the middle of the field
- The passing line is also located about 30 yards away from the goal, but it is out wide by the sideline
- The balls go with the passing line
Drill
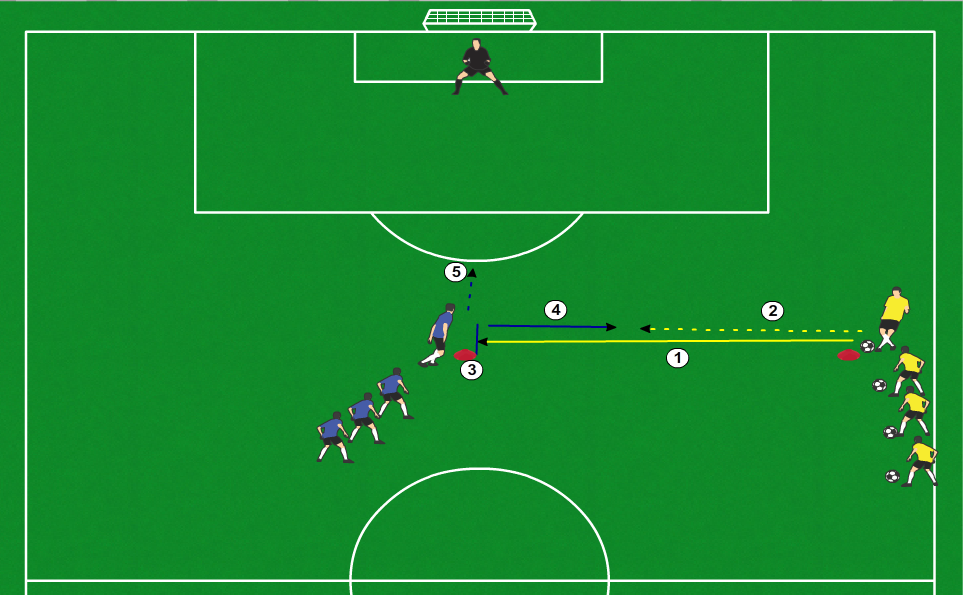
1. The passer passes the ball to the shooter; 2. The passer follows the pass by running towards the shooter; 3. The shooter traps the ball; 4. The shooter passes the ball back to the passer; 5. The shooter starts running towards the goal
- The passer passes the ball to the shooter
- The passer follows the pass by running towards the shooter
- The shooter traps the ball and passes it back to the passer
- The shooter starts to run towards the goal
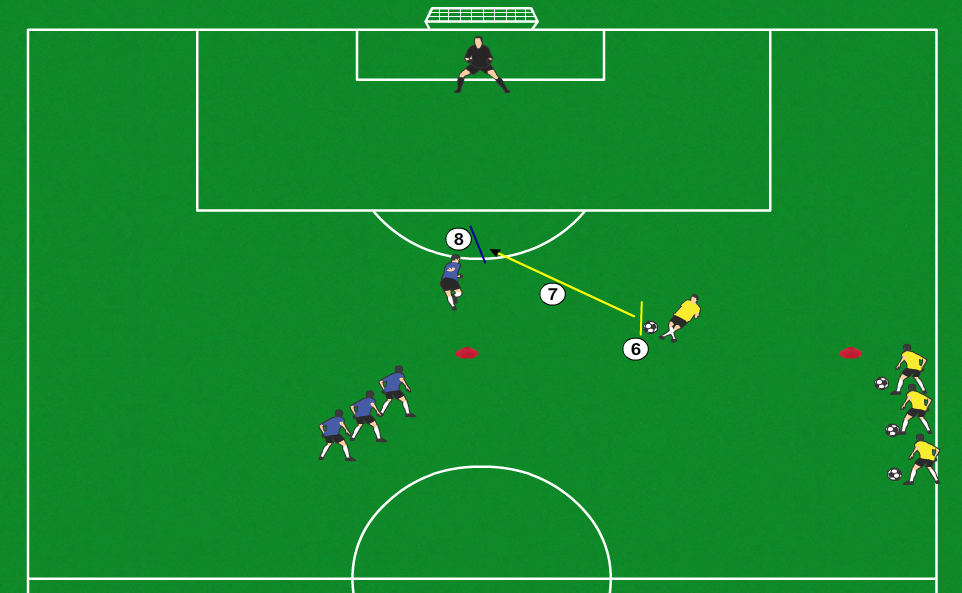
6. The passer traps the ball; 7. The passer passes the ball into the space that the shooter is running towards; 8. The shooter traps the ball into the space towards the goal
- The passer traps the ball and passes it in front of the shooter who is running towards the goal
- The shooter traps the ball into the space towards the goal

9. The shooter takes a touch to set up a shot; 10. The shooter shoots; 11. The shooter retrieves the ball and takes it to the back of the passing line; 12. The passer joins the back of the shooting line
- The shooter takes a touch to set up a shot, and shoots the ball
- The shooter retrieves the ball and joins the back of the shooting line
- The passer joins the back of the shooting line
After 7-8 minutes, switch the passing line to the other side of the field and repeat until the end of the practice
End Practice
- Team cheer
- 1,2,3 Go “team name”!

